In this post, I’ll show how to optimize and display color 3D scans in any WebGL-enabled browser using BabylonJS. I’ll be using Kinect for Windows for my 3D Scan, but you should be able to use these steps using other 3D Scanners as well.


The idea of using the Kinect for creating 3D Scans has been around for a while, and there are commercial packages such as ReconstructMe and Skanect which provide an easy interface for 3D Scanning. However, these packages have limitations and costs associated with them.
As a free alternative, we can use Kinect Fusion and Blender to create and optimize our 3D Scans. Then, we can share our 3D Scans in any WebGL-enabled browser using BabylonJS – a JavaScript library for 3D display and animation.
Step 1: Get the Tools
In this post, we’ll be using a few free tools and libraries:
Kinect for Windows SDK (and Developer Toolkit)Download the latest SDK and Developer Toolkit to enable scanning using Kinect Fusion.
Blender
We’ll use Blender, a free 3D Design tool, to optimize our mesh scans and prepare them for Web sharing
BabylonJS
This free JavaScript library makes it easy to create 3D scenes and games using WebGL.
BabylonJS / Blender Export Plug-in
This plugin for Blender allows you to export a Blender 3D Scene to Babylon format. Download the plug-in and read the install instructions from the link to make it available in Blender.
Step 2: 3D Scan using Kinect Fusion
First load the “Developer Toolkit Browser” which was installed with your Kinect Developer Toolkit. Scroll down and run the Kinect Fusion Explorer – D2D sample.

For Mesh Format, select PLY and check the “Capture Color” checkbox:

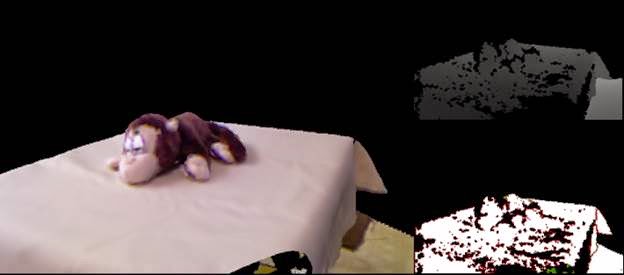
Capture your 3D Scan by either rotating the object in the Kinect’s view, or walking around the object to gather all of the geometry. In this case, I am using a cute little stuffed monkey:
Once you capture all angles, click the “Create Mesh” button to save a .PLY format file (which includes color information) to disk.
Step 3: Optimize the Mesh using Blender
At this point, we have a large amount of data in a very large file, so in order to display it in a browser using BabylonJS, we will need to optimize it. We also need to clean up the model and smooth it a bit, as the 3D Scan adds unwanted artifacts. To do so, we will use Blender. If you are not familiar with Blender, you may be a bit overwhelmed at first – but stick with it, it’s a valuable and fun tool! This post will not include all of the little details on basics of using Blender.
1) CREDITS go to CrowTreeStudios for the vertex color baking process! For a video walkthrough of these steps, see their video here.
2) Open Blender and delete the default cube by pressing “X”
3) Select File/Import/Stanford (PLY)
a) Browse to the PLY file that you exported in Step 2 above.b) This might take a little while, the scans are large!
4) When the model loads, it will not be oriented correctly, so rotate and center it appropriately. You should have something like below, with the model centered in the viewport:

5) Make a copy of the object, by first selecting it and then select Object / Duplicate Objects. In the next steps, we will optimize this copy (by reducing vertex count) and then create a texture map for it using the original mesh’s vertex color information (this is called “Vertex Baking”).
a) Important: Make sure that both the original mesh and the copied mesh are in the exact same Position. This is necessary for proper vertex baking! They should appear in a perfect overlapped position at this point. If you need to tweak, just go to the Object properties panel and set the Location X,Y, and Z.
6) Next, we will optimize and cleanup the mesh, so that it appears smoother and is not so huge on disk and in memory.
a) Hide the original mesh so you can concentrate on the duplicate mesh.b) Select the duplicate mesh (Blender will add a “.001” to the mesh name)c) Activate the Modifies panel and select Add Modifier.

d) Select ReMesh and adjust the Octree Depth up to 6 and the Mode to Smooth. Observe the shape of your modified mesh and you may need to increase or decrease the Octree depth for the proper smoothing and cleanup. When you are happy, click apply. This reduces the vertex count and smooths the scan data out a bit.
7) Your copy should now look much smoother, and any hanging artifacts should be removed:

a) Show the original mesh again by making it visible.
8) Add a material to original, scanned mesh.
a) select the original meshb) add a new materialc) under shading, select "Shadeless”
d) under options, check "Vertex Color Paint"


9) Back under the main Blender View, under "Viewport Shading" (the small sphere icon), select "Texture" (this shows the vertex color data)

10) Now, we can see the scanned in vertex color data from the original mesh. In the next steps, we will create a Texture map from this color data (a process known as Vertex Baking).

11) No we’ll add a material to the optimized (copied) mesh
a) select the copied meshb) add a new materialc) under shading, select "Shadeless"
12) Next we need to unwrap the mesh, as a setup for creating a texture map image.
a) Split the Blender View into two viewsb) in the left view, select UV/Image Editor
c) in the right view, go to Edit mode on the copied meshd) select all verticese) hit "U" for unwrap and then select "Smart UV Project"

13) Now we’ll create an image to store the texture map.
a) in the left-side Image editor, create a New Image
b) Give the image a name and uncheck Alpha, then click OK.


14) For proper vertex color baking, we need to change the default color management in Blender.
a) Select the Scene Panel in Blender
b) Under Color Management, set Display Device to None.


15) No we can Bake our Color Vertex Data to a Texture Map.
a) go to Render Panel (the Camera icon)b) Select the (original) hi-res meshc) Hold Shift down and Shift+Click the Copied (Optimized Mesh). In your scene treeview, you should see the original mesh circled in orange with black text, and the copied mesh in white like so:

16) Scroll down to the Bake Menu
a) check "Selected to active"b) uncheck “Clear”
c) Click the Bake button

17) In the left-hand view, you should see you vertex colors bake into a texture map:

18) Save your texture map to a local file.
a) Select Image/Save as Image from the Image Editor menu…

19) Now we’ll apply this texture map image to the optimized mesh.
a) select the (copied) optimized meshb) add a new texturec) set type = image or movied) open the map image filee) go to mapping and select Coordinates: UVf) select Map: UVMap

20) Now that we have both a Texture Map and an Optimized Mesh, we can delete the original (scanned data) mesh from the project.
a) Select the original mesh and delete it by selecting Object/Delete.
21) Export the Scene to Babylon format.
a) Select File/Export/Babylon JS (if you do not see this option, then go back to the Step 1: Downloads step and read the plugin section)b) The export should create two files: a *.babylon and a *.png (texture map) file.
Step 4: Load and Display with BabylonJS
Now that we have a *.babylon scene file and a *.png texture map, we can easily load and display our 3D Scan using BabylonJS.
1) Make sure your web server has the Babylon Mime Types enabled. In IIS, you would add the following to the system.webServer section (under configuration):
<staticContent>
<staticContent>
<mimeMap fileExtension=".fx" mimeType="application/shader" />
<mimeMap fileExtension=".babylon" mimeType="application/babylon" />
</< SPAN>staticContent>
2) We’ll need to include two scripts from the Babylon download (place these in the scripts subfolder) : hand.js and Babylon.js
3) Create a new HTML file, and add the following code to create the Babylon scene from the exported Blender scene file (comments are inline).
<html>
<head>
<title>Simple Babylon Demo</< SPAN>title>
<link href="index.css" rel="stylesheet" />
<script src="scripts/hand.js"></< SPAN>script>
<script src="scripts/babylon.js"></< SPAN>script>
<script>
window.onload = (function () {
var canvas = document.getElementById("canvas");
// Check that browser supports WebGL
if (!BABYLON.Engine.isSupported()) {
document.getElementById("notSupported").className = "";
document.getElementById("opacityMask").className = "";
} else {
// create Babylon Engine
var engine = new BABYLON.Engine(canvas, true);
// create the Scene
var scene = new BABYLON.Scene(engine);
// add a light
var light = new BABYLON.HemisphericLight("Hemi0", new BABYLON.Vector3(0, 1, 0), scene);
// Add a camera that allows rotating view around a point
var camera = new BABYLON.ArcRotateCamera("Camera", 0, 0.8, 100, new BABYLON.Vector3.Zero(), scene);
// load the scene (exported from blender)
BABYLON.SceneLoader.ImportMesh("", "images/models/", "monkey.babylon", scene, function (newMeshes, particleSystems) {
// optional - position and size the mesh
var monkey = newMeshes[0];
monkey.scaling.x = 70;
monkey.scaling.y = 70;
monkey.scaling.z = 70;
monkey.position.z = -48;
monkey.position.y = 20;
monkey.position.x = 0;
// optional - add in a material and platform
var platform = newMeshes[1];
platform.material = new BABYLON.StandardMaterial("texture1", scene);
});
scene.activeCamera.attachControl(canvas);
// register a render loop to render scene
engine.runRenderLoop(function () {
scene.render();
});
// Resize
window.addEventListener("resize", function () {
engine.resize();
});
}
});
</< SPAN>script>
</< SPAN>head>
<body>
<div id="opacityMask" class="hidden"></< SPAN>div>
<canvas id="canvas"></< SPAN>canvas>
<div id="notSupported" class="hidden">Your browser does not support WebGL</< SPAN>div>
</< SPAN>body>
</< SPAN>html>
Conclusion
Once again, you can see samples of this process a here and a here. As you can see, it is a bit of work to optimize a mesh for display using WebGL, but by mastering these steps we have ultimate control over the size and detail of our meshes. And using WebGL and BabylonJS, we have a cross-platform solution which works in IE11, Firefox, Chrome, and even some mobile browsers.